cPanel control panel is designed for managing separate hosting accounts on the server. End users/clients are able to:
- upload and manage files for their websites
- edit DNS records for their domains
- add/remove addon domains and subdomains
- install CMS using Softaculous script installer
- create email accounts
- manage email settings and SPAM protection
- check website statistics
- manage databases and backups, etc.
We have cPanel 11.52.6 installed on our hosting servers. You can find the latest documentation covering all its functions here.
cPanel structure overview
Basically cPanel has two vertical sections with different features:
Left column which includes different Stats information about the account, the possibility to switch cPanel theme, the search bar and frequently accessed menus and Right column which provides a number of various features that are conveniently structured to specific groups based on the concrete aspect of the web hosting service.
Below you can find a list of each menu for your convenience:
Left Column:
Right Column:
- Preferences
- Domains
- Files
- Logs
- Security
- Databases
- Software and Services
- Advanced
- Exclusive for Namecheap Customers
Left Column
In this column you will find following options:
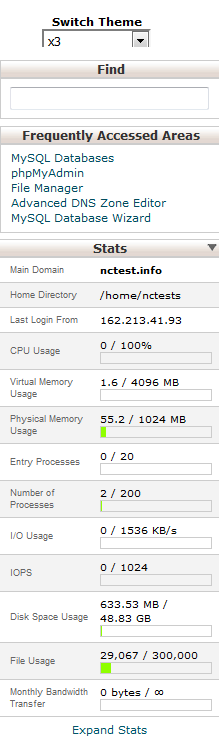
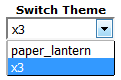
Switch theme: it is a panel for switching between x3 and paper lantern themes:
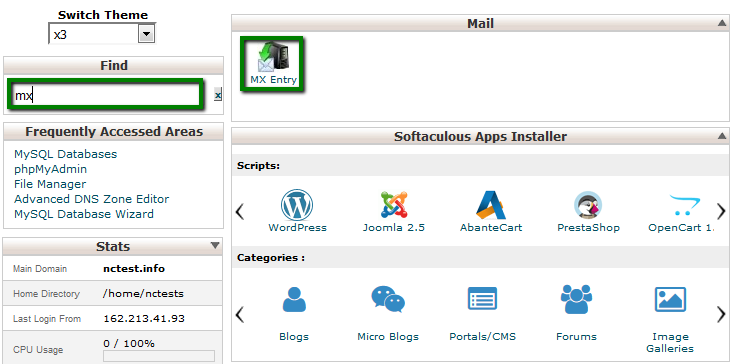
Find: it is a search bar that allows to find cPanel features in the quickest way. Just start entering the name of the needed tool to allocate the corresponding menu:
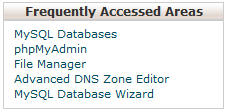
Frequently accessed area: in this section you will find the most visited menus for quick access:
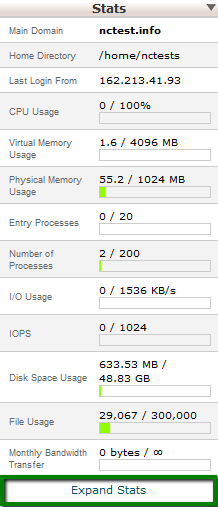
Stats: here you will find all the information related to the statistics of your hosting account. At the bottom of this section you will find Expand Stats button, which allows you to review the full statistics:
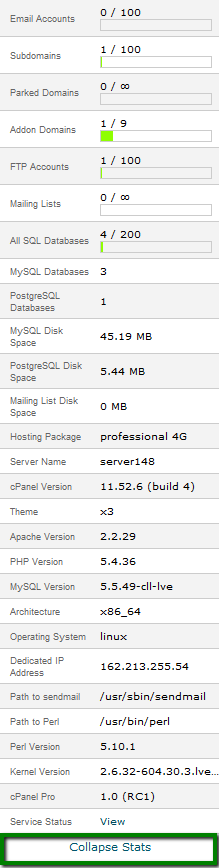
If you see the expanded stats menu, you will find Collapse Stats button at the bottom of this section in order to switch to the short menu version:
Here is an overview of all indexes:
Main Domain: the primary domain name associated with your hosting account.
Home Directory: the path the home directory of your account on the server where your websites' folders and files reside.
Last Login: the last IP address your cPanel has been accessed from.
CPU Usage: this value specifies how much of the allocated CPU resources you are currently using. The amount of CPU resources we provide to each account is the percentage of the server’s resources.
Virtual Memory Usage: this index corresponds to the amount of memory, processes can allocate within LVE. When the process tries to allocate memory, CloudLinux checks if the new total virtual memory used by all processes in LVE is within the limit set. If it is not, CloudLinux will prevent memory from being allocated and in most cases this causes the process to fail.
Physical Memory Usage: the actual memory allocated for your account. Virtual memory is usually a file on a disk drive that the operating system uses to store information (swap-to-from) when the real memory becomes full, for instance the page (swap) file on a Linux system. Therefore, if you try to publish a big post, it might take all physical memory to do so, but after some time it will be normalized.
Entry Processes: this is the number of processes that enter your account. For example, every PHP page that is accessed by a user will usually generate a single entry process.
Number of Processes: this limit is similar to the above but includes all the processes generated by the account rather than the specific PHP, SSH or cron jobs.
I/O Usage: this index represents how much I/O (or disk activity) your account is using. Any task which makes use of the servers disk drive (such as reading or writing to the server) will consume I/O.
More details about resource limits can be found here.
Disk Space Usage: the amount of server disk space provided with your cPanel account. This index displays disk space used by your websites' content, databases, emails, etc.
File Usage: the current number of files (inodes) and your cPanel account's inode limit.
Monthly Bandwidth Transfer: the current amount of data transferred to and from your cPanel account for the month and the total amount of your cPanel account's monthly bandwidth limit.
Email Accounts: the current number of already created email accounts and the total number of email accounts allowed for your cPanel account.
Subdomains: the current number of already created subdomains and the total number allowed for your cPanel account.
Parked Domains: the current number of already created parked domains and the total number allowed for your cPanel account.
Addon Domains: the current number of already added addon domains and the total number allowed for your cPanel account.
FTP Accounts: the current number of already created FTP accounts and the total number allowed for your cPanel account.
Mailing Lists: the current number of already created mailing lists and the total number allowed for your cPanel account.
All SQL Databases: the current number of already created databases and the total number allowed for your cPanel account.
MySQL Databases: the current number of MySQL or MariaDB databases created your cPanel account.
PostgreSQL Databases: the current number of PostgreSQL databases created in your cPanel account.
MySQL Disk Space: the amount of disk space used by your MySQL or MariaDB databases.
Mailing List Disk Space: the amount of disk space used by your mailing lists.
Hosting Package: your current hosting plan.
Server Name: the name of your server.
cPanel Version: cPanel version installed on the server.
Theme: the current cPanel interface layout set for your account.
Apache Version: the current version of the Apache server that is installed on the server.
PHP Version: the version of PHP running on the server.
MySQL Version: the version of MySQL running on the server.
Architecture: the information about the microprocessor type that powers the server.
Operating System: the system software that manages the server. All our shared servers are Linux Based.
Dedicated IP Address: the IP address assigned to your cPanel account.
Path to sendmail: the path of the sendmail program the server. You may find it useful while creating a script that allows visitors to send you emails with a form on your website.
Path to Per: the location of the Perl interpreter on the server.
Perl Version: the version of Perl that your server runs.
Kernel Version: your server’s kernel version, it is the central operating system component.
cPanel Pro: the version of the cPanel Pro software run on the server.
Right Column
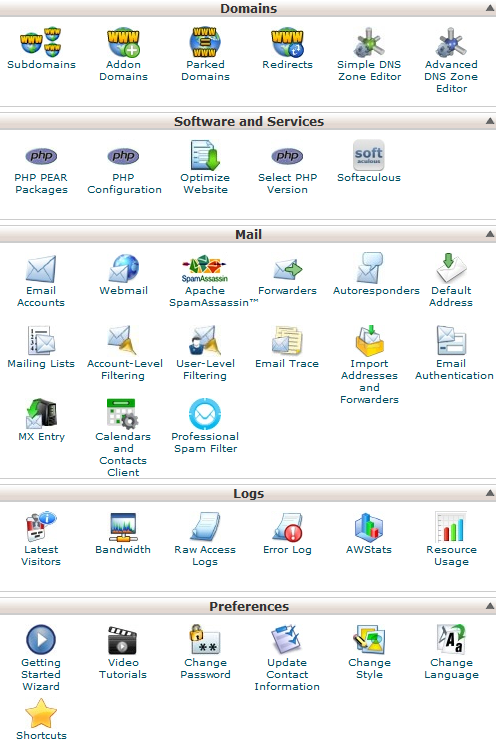
Preferences
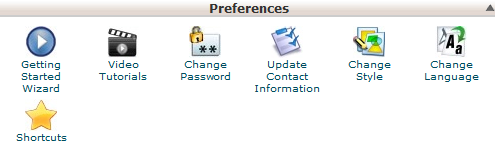
This group of features provides you with the general information on cPanel management and allows you to make basic changes to your cPanel account.
 Getting Started Wizard: this menu can help you to find out more about web-hosting basics and set up main features in cPanel.
  Video Tutorials: here you can find cPanel video tutorials which allow you to easily learn how to use cPanel tools; you can rewind, pause, and fast forward through any of the videos. Note, that all the tutorials are soundless by default.
  Change Password: this menu allows you to change your cPanel main password if know the original one. Otherwise, you can reset the password following the steps in this guide.
  Update Contact Information: in this menu you can specify an email address that will receive system email notifications.
  Change style: here you can change the overall look and feel of the interface by selecting one of the several preinstalled styles.
  Change Language: this feature provides you with an opportunity to change your cPanel interface language.
 Shortcuts: provides cPanel links you can add to your desktop or your browser’s bookmarks toolbar in order to access cPanel in the easiest way.
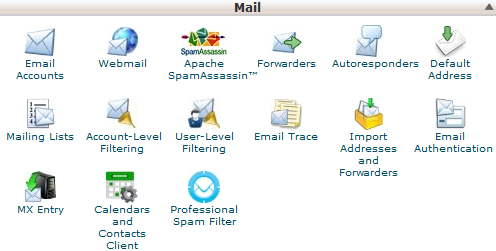
This group of features allows you to create email accounts for your domain names and manage email settings.
 Email Accounts: in this menu you can create and manage mailboxes associated with the domain names hosted in your account.
 In order to create an email account, feel free to check this guidance.
More details about setting up a newly created email account with email clients can be found in the set of articles cPanel Email: Client Setup.
 Webmail: this menu allows you to access your email from any computer using any browser.
 Alternatively you can use direct URLs to access cPanel Webmail:
http://yourdomain.com/webmail
http://webmail.yourdomain.com
http://yourdomain.com:2095
http://yourdomain.com:2096
http://servername/webmail
http://servername:2095
http://servername:2096
You will be required to enter Username (your full email address) and Password (the password set in cPanel during email account setup).
 Apache SpamAssasin: it is a user-friendly email utility which examines incoming mail for different spam characteristics. It uses various network tests and spam filtering to get an overall score in order to decide whether the mail should be considered as spam or not.
 SpamAssassin tool is provided by default with all our shared and reseller hosting plans.
These articles can be found useful for setting up SpamAssasin feature:
SpamAssassin FAQs
How to configure SpamAssassin in cPanel
 Forwarders: setting up Forwarders feature provides you with an opportunity to send a copy of all emails from one email address to another. For example, you have two different email accounts and you don’t want to check both of them every time, so you could forward emails from [email protected] to [email protected]. Note, that the original address will still receive the forwarded emails.
  Autoresponder: this feature allows you to automatically send messages in reply to incoming emails received on a specific email account. This is pretty useful when you are on holidays or unavailable, or if you have any generic messages to send. You will find more information in this guide.
  Default Address: in this menu you can manage an email address, which is used by cPanel to fetch any message sent to email accounts which do not exist at your domain (also known as 'catch-all address'). More details can be found here.
  Mailing Lists: with this option you can create a single address to send emails, newsletters and other updates to multiple email addresses simultaneously. Feel free to refer to this article to get more information.
  Account-Level Filtering: this feature allows you to configure filters of all the emails arriving to your hosted domains.
  User-Level Filtering: with this option you can create filters for each email account for your domain. You can find more details about filtering tools in this article.
  Email Trace: this menu allows you to monitor emails delivery for your account.
  Import Addresses and Forwarders: this menu allows you to use two types of files (.xls and .csv) for importing data in order to simultaneously create multiple email address or email forwarders for your account.
  Email Authentication: this tool will help you to prevent spam. Setting up DKIM and SPF records for your account equip email messages with verifiable information so that your server can automatically detect the nature of incoming and outgoing messages. The detailed guidance about using this feature can be found here.
  MX Entry: here you can check and change MX records for the domains hosted in your cPanel account, more details can be found in this guide.
  Calendars and Contacts Client Configuration: this menu helps to configure your client to connect to CalDAV for calendars and CardDAV for contacts in order to access them on your personal devices. The detailed instructions can be found in this guidance.
  Professional Spam Filter: this menu allows you to configure SpamExperts, a user-friendly email filtering solution that allows to protect your account from both incoming and outgoing spam. More information about this feature is provided in this article.
 Domains
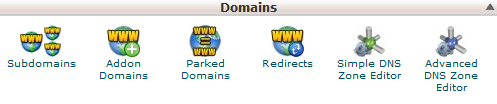
 Subdomains: in this menu you can create subdomains and point them to different sections of your website or other IPs. Detailed instructions about this menu can be found in this article.
  Addon Domains: with the help of this menu you can add more domains to the hosting account. Addon domains have the same functionality as the main domain assigned to your hosting account. More details about adding domains to cPanel are provided here. Parked Domains: this feature allows you to 'park' additional domain names to your existing hosting account. They display the same website as your primary domain and share web statistics as well. You can refer to this guide when setting up a new parked domain.
  Redirects: here you can create a redirect for a specific domain/page to another domain/page and display the contents of the latter. More details can be found here.
  Simple DNS Zone Editor: using this feature you can add A and CNAME records for your domain(s).
  Advanced DNS Zone Editor: allows you to edit the DNS zone of the domain(s) in your cPanel account. The following records can be added: A record, AAAA record, CNAME record, SRV record, TXT record. Feel free to check this article to get more information about setting up DNS records in cPanel.
 Files
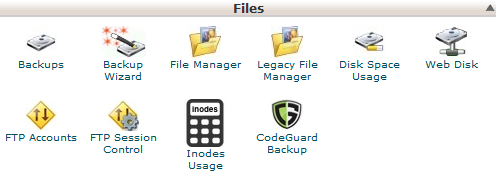
 Backups: this feature allows you to download a zipped copy of your entire account or specific parts of it, such as your home directory, databases, email forwarder configuration, or your email filters configuration. More details guidance about how to make backups in cPanel can be found here.
  Backup Wizard: a user-friendly interface for creating a backup of your entire site, a partial backup, or allowing a site restoration from the last backup saved. Note, that Restore option provided in this menu is disabled by default on all our shared servers.
  File Manager: here you can manage the files stored in your account. These guides can be found helpful while working with this menu:
 How to use file Manager in cPanel
How do I upload my site?
 Legacy File Manager: provides you with the same options as File Manager, but in a different old interface. You can do only one operation on Legacy File Manager at a time. Still, you are able to perform multiple operations with modern File Manager (like deleting many files) simultaneously. So, File Manager is more practical and faster if you need to make several changes simultaneously.
  Disk Space Usage: in this menu you will be able to check a detailed information about the disk space usage of your account. It shows disk usage totals for your account’s directories and all of its databases, not for individual files or databases. More details about Disk Space usage optimization are provided in this article.
  Web Disk: this feature is a cPanel implementation of the WebDav protocol, which allows you to manage, upload, and download your website’s files as though they were local to your personal computer. More detailed instructions about setting up WebDisk can be found in these articles:
 How to set up Web Disk on Windows 7
How to set up Web Disk on Windows 8
 FTP Accounts: this option allows you to create and manage your FTP accounts. In order to create an FTP account, feel free to check this article. For FTP connection instructions, refer to this set of guides:
How to access an account via FTP
How to set up FileZilla
How to set up Cyberduck
How to set up iWeb
How to set up Adobe Muse
How to set up Dreamweaver
How to set up CoreFTP Client
How to set up CuteFTP
 FTP Session Control: using this tool you can monitor the users who are currently logged into your site via FTP. Also, it’s possible to terminate an FTP connection from here.
 Inodes Usage: provides the statistics of your account inodes (files) usage.You will find more details about this tool here.
Logs
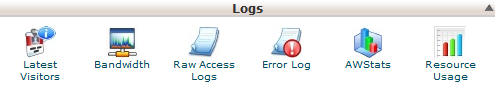
 Latest Visitors: the access log of your account provided in a table view.
  Bandwidth: provides you with the detailed information the bandwidth used by your account.
  Raw Access Logs: the RAW access log for your account
  Error Log: here you can check the error log for your account, showing the latest 300 lines of content related to the errors generated by any website hosted in your account.
  AWStats: this tool provides you with an opportunity to monitor the access indexes on your account – users, robots, accessed pages and many, many more. You will find a more detailed explanation in this article.
  Resource Usage: shows information on the resources consumed by your account.
 Security
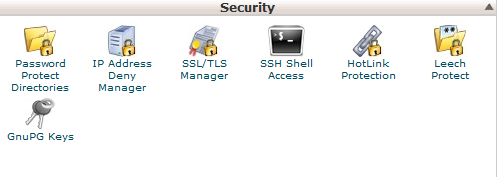
 Password Protect Directories: allows you to set a requirement for a username and password when users attempt to access your site from the web. It can be used when you need to limit access to a certain part of your site. You can get more details in this guide.
  SSL/TLS Manager: this tool will help you to install and manage your SSL Certificates. You will find a more detailed guide here.
  SSH Shell Access: here you can generate an access key for your account in order to connect using SSH keys. More details about setting up SSH keys can be found in this article.
  Hotlink Protection: in this menu you can enable hotlink protection for your website (that is to prevent someone from direct linking of your images to another website and, as a result, consuming your hosting account bandwidth). Feel free to check this guidance for additional information.
  Leech Protect: allows you to control whether users can give out or publicly post their passwords for restricted areas of your site. It can be used to redirect compromised accounts to the URL of your choice, or suspend them.
  GnuPG Keys: this option allows you to set up GnuPG, which is a publicly-available encryption scheme that uses the public key approach. This system uses a public key to encrypt messages and you can decrypt them with the private key, which the intended recipient of the message retains.
 Databases
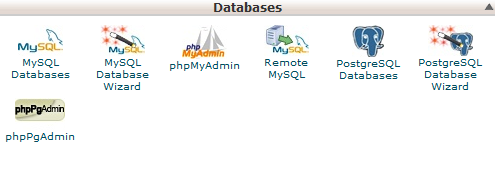
 MySQL Databases: in this menu you can create and manage MySQL databases in cPanel account.
  MySQL Databases Wizard: provides the same functionality as MySQL Databases menu, in a simplified way though. More details about how to use both menus can be found here.
  phpMyAdmin: the database management tool, which allows you to make different changes to MySQL databases in your account. You can find more information about how to work with databases via phpMyAdmin this guide.
  Remote MySQL: this feature is provided for allowing IP addresses to connect to the databases located in your account. Note, that this option is not supported on all our shared hosting servers. Remote MySQL connection is disabled on our shared servers due to security reasons, but you can easily set up an SSH tunnel between your PC and our server using SSH client with further MySQL port 3306 forwarding. This guide will help you with the setup process.
  PostgreSQL Databases: this option allows you to create and manage PostgreSQL databases in cPanel.
  PostgreSQL Databases Wizard: has the same functionality as PostgreSQL Databases menu, but allows to make all the changes in a simpler way.
  phpPgAdmin: the database management tool, which allows you to make different changes to PostgreSQL databases in your account.
 Software and Services
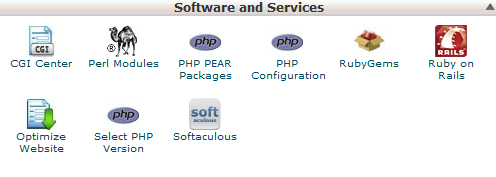
 CGI Center: this feature allows you to check the list of pre-installed CGI which can be used in your account.
 Perl Modules: here you can manage Perl modules available for your account. A Perl module is a discrete component of software for the Perl programming language. Perl is supported on all of our shared/reseller servers.
 This article will provide you with more details about this feature.
 PHP PEAR Packages: this options allows you to install and maintain PHP PEAR packages for your hosting account. PHP Configuration: here you can check PHP configuration settings. They cannot be customized via this menu. The system displays them for your reference only.
 In case you need to change PHP settings, feel free to check following articles:
How to edit php.ini on shared servers
How to change PHP version on shared servers
How to change PHP version on business servers (for older servers)
How to change PHP version on business servers (for newer servers)
 RubyGems: in this menu you will find the set of functions that allow you to perform tasks in Ruby. It’s needed to install a Gem before you can use it inside a Ruby program.
  Ruby on Rails: with this menu you can use Ruby on Rails features.
 Ruby on Rails is a free web application framework for the Ruby programming language. It is often referred to as 'Rails' or 'RoR'. We support RoR with our Professional, Ultimate, Business SSD and Reseller packages. The following versions are working on our servers: Ruby - 1.8.7, Rails - 2.3.18.
More information can be found in this guide.
 Optimize Website: this feature allows you to enable/disable and configure the compression of your website by tweaking the way Apache handles requests, which can increase the performance of your website. Select PHP Version: here you can change PHP version applied to your cPanel account. You can find more information in this article.
  Softaculous: this feature allows you to use Softaculous Script Installer, which includes most popular CMS, such as Wordpress/Joomla/Magento etc. It is much faster than other script installers and it installs CMSes in a few clicks. Softaculous application is provided with any cPanel account on all of our shared hosting plans. You can view available scripts and their demo here.
 You may find these guides useful when working with Softaculous installer:
How to work with scripts in Softaculous
How to install WordPress using Softaculous
How to install Joomla with Softaculous
Advanced
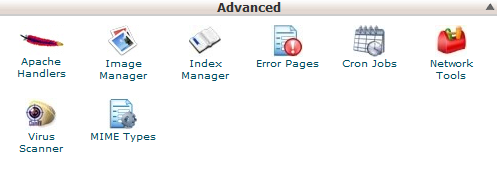
 Apache Handlers: here you can configure different Apache handlers for dealing with certain file formats.
  Image Manager: this tool allows you to view and modify images in your account.
  Index Manager: in this menu you can customize the way in which visitors can view a directory on the web.
  Error Pages: this feature allows you to edit the code for the default errors pages your website can display.
  Cron Jobs: here you can set up scripts running on a scheduled basis. For more details about setting up CronJobs refer to this guidance.
  Network Tools: provides you with an option to find information about any domain or to trace the route from your website’s server to the computer from which you access the system.
  Virus Scanner: this tool will allow you to scan your account for viruses with ClamAV virus scanner.
 ClamAV is an open source (GPL) anti-virus engine used in a variety of situations including email scanning, web scanning, and end point security. It provides a number of utilities including a flexible and scalable multi-threaded daemon, a command line scanner and an advanced tool for automatic database updates.
 MIME Types: provides you with the information about the system predefined MIME types and the option to add a MIME Type on your own.
 Exclusive for Namecheap Customers
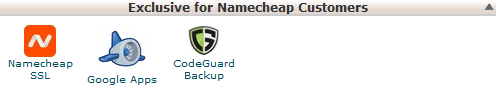
 Namecheap SSL: this menu allows you to use Namecheap SSL cPanel plugin, check this guide for more details.
  Google Apps: with this tool you will be able to configure Google Apps service for your domain in just a few clicks. Feel free to check this category for more information.
  CodeGuard Backup: this tool was designed to make the backup process as easy as possible. CodeGuard system will constantly monitor the website and keep you informed of any changes, performing full automatic backups of your files to avoid any possible downtime.
 More information is provided in the following articles:
How to make backups using CodeGuard
How to back up a WordPress site using CodeGuard
